I have been playing a lot with designing my own SVGs. For this project I took inspiration from several shadow boxes that I have seen for sale and wanted to try and create my own. I kept it very simple and just created as I went.
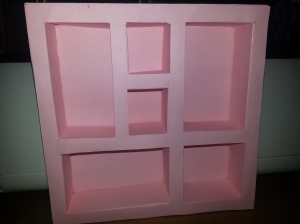

The box is 8x8 with different size cubbies built in. I cut "liners" for each opening and glued them together.


Then I put a backing on to pull it all together. I am really surprised at how sturdy this has turned out. I still have some more tweaking to do. I went back in and enlarged the glue tabs. I also am going to add a couple of holes to the top so I can add ribbon for a hanger.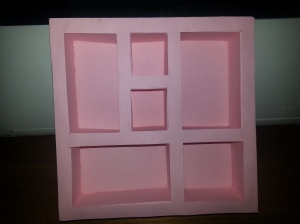
Though I do think for my first test drive at a shadow box this has really turned out well!

Though I do think for my first test drive at a shadow box this has really turned out well!
Let me know what you think!
~Christy
Looks good to me :) New follower from Deezy's Pimpout Showcase blog.
ReplyDeleteThank you Kris! This svg is my own design.....I'm still tweaking it :-) lol
ReplyDeletegreat job!!! I am now following you too!! thanks for visiting my blog even if it was an accident :)
ReplyDeleteCome link up your project over at Tara's first Linky Party over at Craftin Desert Diva's.
Robin
http://cutonedesignsbyrobin.blogspot.com/
:-) Thanks Robin! I'll go and check it out!!
DeleteThis is cool, great job!
ReplyDeleteThank you Marji!!
DeleteBeautiful! Hope you'll share the finished product when you have it all filled and embellished! I am your newest follower - here from Pimpin' is Eezy!
ReplyDelete:) I will Camille!! I did start following both of your blogs. Thank you for following mine.
DeleteThanks for stopping by my blog! I'm a follower now and look forward to seeing your creations!
ReplyDeleteThank you!!
DeleteI think it turned out nice too, and I like that it's all pink!
ReplyDeleteI'm your latest follower, visiting from the Pimp Out Showcase Blog Hop.
Wow-how nice is that! Until I looked at all your pattern pieces, I would never have guessed that this was made of paper. Think of the possibilities...use old maps, sheets of music, scanned photos from old high school year books or wedding albums (even if those papers need to be glued to sturdier paper underneath)-the ideas can be endless. Great way to display memorabilia. Well done!!!
ReplyDelete:-) thanks for visiting :-)
DeleteThis is such a neat idea! I love it. New follower from Scrap Happy in Ohio. :)
ReplyDeleteThank you for stopping by!
DeleteThis is amazing! What a wonderful job you did in designing it and putting it together! I am a new follower from the pimp out showcase and loving what I am seeing! *Hugs*
ReplyDeleteThis looks fabulous! I was looking through some of the other posts and you are very creative. I'm definitely following to keep up with your other crafts. Love the "Cancer Messed with the Wrong Girl" Centerpiece.
ReplyDeleteSharon
http://makeitorfixit.com
Thank you Sharon -- for stopping by AND you nice comments! ;-) As you might have guessed the centerpiece was very close to me. I also appreciate that you liked the Facebook page! I just added it last night and you are the first to like it through the blog!
DeleteCome back and visit any time!
Christy